Zikka's remembrance

My Photo
Name:
Location: Dublin, Ireland, Ireland

Monday, May 28, 2018

Build An Incredible Back With This 30 Minute Workout

Build An Incredible Back With This 30 Minute Workout

    Your goal is to build a perfect back, but you don’t have the time! You can train hard, you can eat right but you really do not have the time to spend in the gym. You go to work, you take care of your family and you are not the same gym goer you used to be.
    Believe it or not, you can still build an impressive back with a 30 minute workout. The back is a complex area that can be divided into 3 main parts:
    • Lower back.
    • Middle back.
    • Upper back.
    If you dedicate 10 minutes of intense training to each one of these areas and give all you can, you can be sure that you’ll send a strong stimulating signal to your back, to make it grow. Let’s take a look at the exercises for each of these main areas of the back.

    Your Lower Back

    Because the lower back can take the most beating, you’ll be training it with the heaviest weights and you want to hit this area first. The exercise of choice here are the deadlifts for obvious reasons. Deadlifts stimulate the whole back, but target the lower back the most and you’ll be able to handle heavy reps by using correct deadlift form.
    You should be able to complete 5 sets of deadlifts in 10 minutes. Use the first and the second set as warm up sets. Then increase the weight gradually from the third to the fifth set and give all you got.

    Your Middle Back

    Your middle back ( or your lats ) can be worked with two compound movements in a super-set. You can start with lat pulldowns (or pull-ups) as a first exercise and superset with cable rows. Combining these two exercises will make sure you are hitting your lats hard and saving time when doing supersets. Aim for 3 super-sets in 10 minutes.

    Your Upper Back

    This is the final part. You have already worked these parts to an extent with the deadlifts so you can use moderate weights now. You are going to do barbell shrugs and upright rows for your upper back. Try to do 3 sets of 10-12 reps for each of these exercises.

    About The Back Workout

    Even though it’s just a 30 minute workout, you’ll see that this is one tough back workout. Remember, you are in the gym to work out, so make sure you are using the short times between exercises to take your breath and not talk or socialise. You’ll be doing a great amount of volume in just 30 minutes. Be sure you have enough fuel in your tank to go through the workout.

    10 Minute Home Bodyweight Abs Crusher Workout

    10 Minute Home Bodyweight Abs Crusher Workout

      We are going to provide you with 9 bodyweight exercises, that consist of using only 10 minutes of your time, to help achieve a defined 6-pack! These moves will force your abs to become strong and defined and you do not need a gym or any equipment.
      It’s important to warm-up your abs before you start, then keep them tensed throughout each move to work the muscles close to their capacity. By the end you should be able to feel the muscles worked, and that’s what it takes to make them look and perform better.
      So, all you need to do, is perform the nine moves in order shown for 20 sec each, and resting for 10 sec between moves. At the end rest for 10 sec then repeat the circuit. Do this at the end of a session a couple of times a week, or after a good stretching workout, then change the moves you do. It is also advisable to stretch after!

      1. Hollow plank

      Time: 20sec Rest: 10sec
      Why: It works your all abs muscles, including the deep-lying stability muscles, as well as strengthening your lower back.
      How To:
      • Lie on your back with your arms and legs fully extended.
      • Contract your abs and raise your hands and feet off the floor.
      • Maintain this tension on your core for 20 seconds without letting your hands or feet touch the floor.
      2. Plank side-to-side feet jump and tuck
      Time: 20sec Rest: 10sec
      Why: It works your upper and lower abs, as well as your obliques (side abs).
      How To:
      • Start in the top of the press-up position, then jump your feet forwards so your knees come towards your hands.
      • From there kick your legs back and to one side, then bring your knees back into the middle and then out to the other side.
      • Focus on keeping each jump smooth while maintaining tension on your working muscles.

      3. Bicycle crunch

      Time: 20sec Rest: 10sec
      Why: It primarily works your obliques, but your upper and lower abs are also heavily recruited to keep your upper back and feet up off the floor.
      How To:
      • Lie on your back, then crunch your torso up while lifting your feet from the floor.
      • Crunch and twist your torso so your elbow comes forwards while bringing in the opposite knee, so they meet over your body.
      • Reverse the move to the start position, then repeat with the opposite elbow and knee, making sure you keep your feet off the floor for the full 20 seconds.

      4. Rolling plank

      Time: 20sec Rest: 10sec
      Why: A tough variation on the classic plank that places more emphasis on your obliques.
      How To:
      • Start in the plank, resting on your forearms with your elbows under your shoulders.
      • Roll to one side so that your hip touches the floor, then roll back to the other side so that hip touches the floor.
      • Repeat, keeping the movement slow and controlled.
      5. Heel touch
      Time: 20sec Rest: 10sec
      Why: Far harder than it looks, this move works your upper abs and obliques.
      How To:
      • Lie with your upper back off the ground, knees bent and feet flat on the floor.
      • Crunch and reach forwards with one straight arm to touch your ankle, then go back to the start and repeat on the other side.
      • Keep your upper back off the floor throughout.

      6. Side plank crunch

      Time: 20sec Rest: 10sec
      Why: Another move that works your obliques, while the crunch movement recruits the small stabilising muscles to keep you balanced.
      How To:
      • Start in a side plank position resting on one forearm, with your elbow under your shoulder.
      • Hold your top arm straight out next to your head with your top leg raised.
      • Contract your abs to bring your elbow and knee together, then straighten both back out.
      • Swaps sides for the second set.

      7. Legs-together hip thrust

      Time: 20sec Rest: 10sec
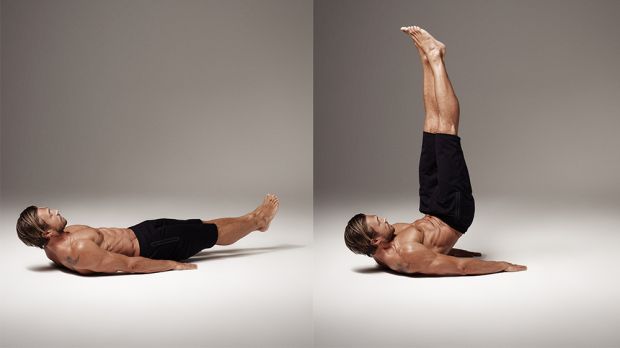
      Why: One of the hardest and best ways to work your lower abs, which is crucial if you want to turn a four-pack into a six-pack.
      How To:
      • Lie on your back with your legs together and raised off the floor, and your arms straight and on the floor.
      • Contract your abs to lift and raise your glutes and lower back off the floor.
      • Hold this position at the top, then lower back to the start and repeat.
      8. Press-up kick-out
      Time: 20sec Rest: 10sec
      Why: A challenging but rewarding move that works your chest and shoulders as well as your abs.
      How To:
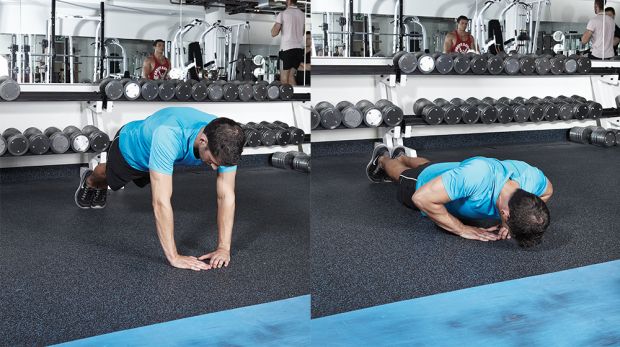
      • Perform a press-up then, as you return to the start position, go onto one hand to raise your torso and kick your leg through.
      • Return to the start position, do another press-up, then repeat but kick through to the other side.
      • Keep each rep smooth and controlled and make sure your abs are fully engaged to prevent yourself from falling over.

      9. Plank with leg raise

      Time: 20sec Rest: 10sec
      Why: Raising your legs alternately will force your entire core to remain activated for the full 20 seconds of work.
      How To:
      • Start in the plank position, resting on your forearms with your elbows under your shoulders.
      • Brace your core, then raise one foot as high as you can, keeping your leg straight.
      • Lower it again, then raise your other leg.
      • Keep each rep smooth and controlled, and hold your foot in the top position briefly to really work the abs hard.

      9 Mobility Exercises to Relieve Shoulder Pain

      9 Mobility Exercises to Relieve Shoulder Pain

        The shoulder joint is the most complex joint in the human body. It is tasked with giving you both the mobility to move your arm 360 degrees, as well as the stability that allows all the bones, muscles, tendons, and ligaments that make up the shoulder to work together.
        With all of parts that make up the shoulder, it’s common to experience pain or loss of mobility due to injury. If you are experiencing shoulder pain, try these exercises to help relieve your pain. Remember to always see a doctor if you experience shoulder pain that is not relieved by several days of rest, ice, massage, and elevation.

        9 Mobility Exercises for Shoulder Pain

        To improve overall shoulder mobility, these exercises focus on releasing the muscles surrounding the scapula, mid-back, and chest. They use a combination of:
        • Closed chain exercises (i.e., keeping a hand/forearm/elbow on the floor).
        • Open-chain exercises (i.e., functional movements that don’t require stabilising against the ground).
        • Fascial-release exercises (to release the connective tissue that surrounds the shoulder girdle and pecs).

        Rolling Chest Stretch : Hold for 3 breaths per side

        How To:
        • Start by lying on your stomach with your arms stretched out to the side in a letter “T” position.
        • Keep the palms facing down. Bend the left elbow, and press the left palm next to the left side of the ribcage.
        • As you roll the body towards the right hand, press into the left hand, bend the left knee, and take the foot to the outside of the right leg.
        • Hold for 3 breaths, before gently releasing.
        • Switch sides.

        Scapula Shrugs : 15 reps

        How To:
        • Start on hands and knees.
        • Keep the elbows straight as you shrug your shoulder blades together.
        • To push the shoulder blades apart, press more into the hands, towards the side of the ribs.
        • Continue to shrug in and out for 15 repetitions.

        Thread The Needle : Hold for 5 breaths per side

        How To:
        • Start on hands and knees, with the fingers pointing in towards each other.
        • Bend the right elbow as the left arm reaches under the body and across to the right side.
        • The left shoulder and ear can relax down onto the floor (if your flexibility allows).
        • Hold in this position for 5 breaths.
        • Switch sides.

        Arm Circles : 5 circles forward and back

        How To:
        • Start by kneeling on the floor or sitting in a chair.
        • Keep the arms down by the side, palms facing the hips.
        • Sweep the right arm up overhead, the palm facing in towards the body.
        • At the top, rotate the palm away from you.
        • Continue to circle the arm back behind the shoulder (with the thumb pointing down) until you return to the starting position.
        • Complete 5 circles forward and 5 circles back.
        • Switch sides.

        Scapula Glides : 5 reps per side

        How To:
        • Start by kneeling on the floor or sitting in a chair.
        • Reach the right arm forward, directly in front of the chest (with the palm facing the left side).
        • Reach through the right fingertips, so the right shoulder blade glides away from the spine.
        • Keep the torso still, then glide the shoulder blade back in towards the spine.
        • Keeping the elbow straight.
        • Continue to move the shoulder blade out and in for 5 repetitions.
        • Relax the arm, then switch sides.

        Upper Back Bend and Stretch : 5 reps

        How To:
        • Start by kneeling or sitting in a chair with the hands behind the head, and elbows straight out to the side.
        • EXHALE, round the upper back, and relax the chin to the chest.
        • Allow the elbows to drop down and in towards each other *.
        • INHALE and lift the elbows, head, and chest. Continue to extend the upper back, and tuck the breastbone.
        • The eyes gaze towards the ceiling.
        • Continue to alternate between these two positions for 5 repetitions.
        *Note: Do NOT pull on the head or neck. Simply allow the natural weight of the hands to drape the chin to the chest.
        Related article:

        Ball Against Chest : 30 sec per side

        How To:
        • Start by lying on your back.
        • Take a fascial-release ball or tennis ball.
        • With gentle pressure, use your left hand to roll the ball against the right side of your chest and the front of the shoulder.
        • Avoid rolling on the sternum (breast bone).
        • Continue for 30 seconds before switching sides.

        Ball Under Shoulder : 30 sec per side

        How To:
        • Start by lying on your back.
        • Take a fascial-release ball or tennis ball, and place it behind your right shoulder (below the clavicle and above the scapula).
        • Gently roll from side to side (against the ball) for 30 seconds.
        • Remove the ball, and switch sides.

        Ball Under Armpit : 5-10 breaths per side

        How To:
        • Start by lying on your left side, with the knees bent and the left hand cradling the head.
        • Keep the elbow reaching forward on the floor.
        • Gently place a fascial-release ball or tennis ball under the side of the left shoulder (at the back of the armpit, in the teres minor and major muscle group).
        • This exercise is very tender, so be gentle.
        • Hold for 5-10 breaths, depending on the intensity.
        • Switch sides.
        • You can also do this exercise standing against a wall, with the ball between the wall and shoulder (which is a more gentle version).

        Triceps Workout: 3 Superset Workout Routine For Killer Triceps

        Triceps Workout: 3 Superset Workout Routine For Killer Triceps

          Not surprisingly it is more common to focus on bicep training opposed to tricep. But training your triceps are equally important, if not more, for an overall proportional shape, strength and definition.
          With this six move workout, comprising of two super-sets, we have compiled the perfect tricep training for you! Plus this will incorporate back, biceps and a slight chest impact, meaning you will define in next to no time.
          By performing the super-sets you are engaging the neglected muscle fibres, meaning your body will become stronger and gain muscle mass, giving you a sculpted, even definition and equal strength throughout each muscle group in the arm.

          How to do the workout

          This is a six-move session divided into three supersets. Do a set of move 1A and go straight on to 1B, sticking to the sets, reps and rest shown until all sets are completed for both. Then follow this same superset pattern for moves 2A and 2B, then 3A and 3B.

          Superset 1

          Warm up thoroughly by doing three to four sets each of move 1A and 1B, starting with a low-weight, high-rep set. With each warm-up set increase the weight and reduce the reps until you get to your work-set weight.

          1A Decline close-grip press

          Sets 4 Reps 12 Rest 60sec
          Tip: Having your elbows tight to your sides shifts the emphasis to your triceps.
          How: 
          • Lie on a decline bench holding an EZ-bar with a shoulder-width grip.
          • Lower the bar to your stomach, keeping your elbows tight to your sides.
          • Then press back up.

          1B Decline skullcrusher

          Sets 4 Reps 12 Rest 60sec
          Tip: It’s a great move to isolate your triceps and move them through a good range of motion.
          How:
          • Lie on a decline bench holding an EZ-bar with a shoulder-width grip.
          • Keeping your elbows pointing straight up, lower the bar down towards your forehead.
          • Pause, then straighten your arms to return to the start.

          Superset 2

          Triceps dips and diamond press-ups are two of the most challenging bodyweight moves you can do and they’re seriously effective for building bigger triceps. Focus on good form and keeping each rep slow and controlled to increase muscular workload and minimise any momentum that will cheat you of maximum gains.

          2A Triceps dip

          Sets 4 Reps 6-12 Rest 60sec
          Tip: It’s the classic bodyweight triceps move because it’s so effective.
          How:
          • Hold parallel bars with your chest up and abs and glutes engaged.
          • Bend your elbows to lower yourself as far as possible.
          • Press back up powerfully, without fully locking out your arms at the top.

          2B Diamond press-up

          Sets 4 Reps 6-12 Rest 60sec
          Tip: It’s a tough variation of the press-up that taxes your triceps.
          How:
          • Form a diamond with your thumbs and index fingers, then lower your chest to the floor.
          • Press back up but don’t lock out your arms.

          Superset 3

          These two cable moves will increase the workload on your triceps because they must control the weight on the way up as well as the way down. Keep the reps slow and focus on flexing your triceps as hard as possible as you straighten your arms to recruit even more triceps muscle fibres.

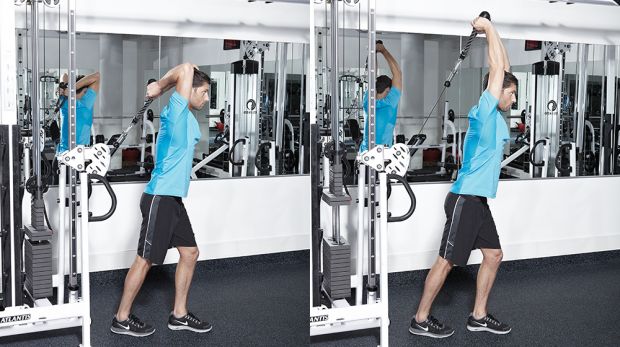
          3A Cable overhead extension

          Sets 4 Reps 15 Rest 60sec
          Tip: Using a cable keeps tension on your triceps for both the lifting and lowering part of each rep.
          How:
          • Stand tall, holding the double-rope handle behind your head.
          • Press upwards to straighten your arms.
          • Slowly return back to the start position.

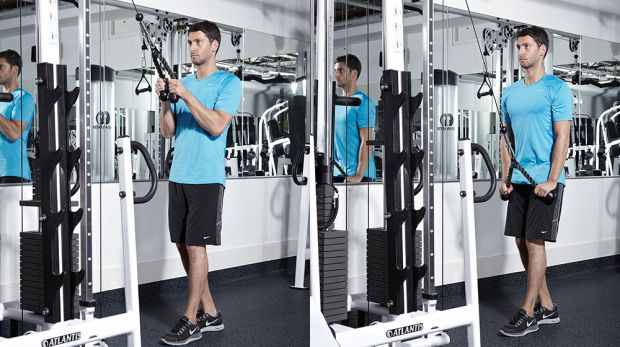
          3B Cable press-down

          Sets 4 Reps 15 Rest 60sec
          Tip: It’s an easy move but keeping your form strict will work your triceps to full fatigue.
          How:
          • Stand tall, holding the double-rope handle in both hands.
          • Keeping your chest up and abs braced, press down to straighten your arms fully.
          • Return slowly to the start position, squeezing your biceps hard at the top.

          Dumbbell Training: What Are The Benefits Of Training With Dumbbells?

          Dumbbell Training: What Are The Benefits Of Training With Dumbbells?

            In most strength and bodybuilding training programme, the barbell is usually the preferred reference. When we talk about how you one can benchsquat or deadlift, we mean the exercises done using the barbell.
            However, what many people do not know is that dumbbell training provide many advantages to athletes, bodybuilders and anybody that trains for general fitness.
            In many cases, dumbbell exercises are actually much better than its barbell counterparts. This article will give you a list of the advantages of dumbbell exercises over barbell exercises.

            Balance

            Training with dumbbells requires more balance than with barbells or machines. Most of us are unsymmetrical in strength. One arm or one leg tend to be stronger than the one on the other side. With a barbell, the stronger arm cannot assist the weaker arm when you train with dumbbells. So when training with dumbbells, you have to use the resistance that the weaker arm can handle. Training with dumbbells will prevent the imbalance of strength and muscle development. Also enhance athletic performance, a significant consideration in fitness programs.

            Unilateral Training

            One huge benefit of training with dumbbells is that you can train one limb at a time. This can emphasize greater movement specificity in the training programs of athletes and greater program variety for bodybuilders. By training for one limb, you can improve the strength and muscle mass of a limb without effecting the other. Definitely helps in case you have an imbalance of development.

            Stability

            Dumbbell training requires more muscular control than barbells. You can check it yourself when comparing dumbbell benchpress with barbell bench press. So in order to train with dumbbells, you will need to recruit more stabilising muscles, enhancing joint stability and hypertrophy and kinesthetic awareness.
             

            Safety

            Some exercises can be done safer with a pair of dumbbells than a barbell. When performing certain types of leg exercises like step-ups or lunges, it is usually much easier and safer to hold a paid of dumbbells in your hands rather than a barbell on your beck. If you lose your balance, you just need to drop the dumbbells from your hands instead of letting the barbell slide off your back.
            Dumbbells are much safer when you work out alone without any spotter. With dumbbell benchpress, you can put the dumbbells to your sides without any problem at all.
            Another safety benefit of dumbbell training is that it can prevent potential injuries in the shoulders, elbows and wrists. You can see the problem when comparing doing barbell curl or barbell benchpress with dumbbell curl or dumbbell benchpress.
            When you curl or bench press with a barbell, your hands are fixed and this leads to unnatural positions for the joints. But if you curl or benchpress with dumbbells, your elbows, wrists and shoulders are allowed to rotate freely and naturally.

            Conclusion

            Both dumbbells and barbells are equally effective in general for your training goal, but in some specific situations one type of exercise may be a little more beneficial for you than the other. So the best advice for you is to combine both dumbbell training and barbell training into your work out program and get the most out of both types of training.

            Dumbbell Abs Workout For A Solid Core

            Dumbbell Abs Workout For A Solid Core

              We have compiled an article with exercises where you benefit using only one dumbbell! That’s right ONE dumbbell! Believe it or not these exercises will target your core, obliques, back and biceps, and still give you the defined, strengthen muscle mass you require. The reason for this, is we appreciate the annoyance when you arrive at the gym and everything is in use, but a single dumbbell can be equally affective as using two or any other equipment to target your abs.
              The best thing about these exercises are, if dumbbells aren’t free, you can easily subsidies them for a kettle bell or even a weight plate. These carefully executed exercises will leave your upper body burning for more!

              Workout:

              • Complete the following five moves in the order shown.
              • Perform 15 reps of a lift and then move on to the next without rest.
              • After the final move, rest for 60 seconds.
              • Repeat.
              • Do six circuits in total.
              • Make the circuit easier with a lighter dumbbell, or harder with a heavier one.

              Weight:

              Beginner: 8kg
              Intermediate: 12kg
              Advanced: 16kg

              Dumbbell swing:

              HOW TO:
              • Hold a dumbbell in both hands.
              • Bend from the hips to lower the weight between your legs, then push your hips forward to raise it up to shoulder height.
              • Reverse back down to the start.
              Why?
              This is a take on the classic kettlebell swing that offers all the same benefits. The hip hinge that forms the basis of this move is one of the core foundational bodyweight movements that you should work on mastering before beginning any weight training programme.

              Side bend with dumbbell:

              HOW TO:
              • Stand tall, holding the dumbbell in one hand.
              • Keeping your chest up, lower the weight – this will hit your obliques.
              • Complete all the reps, then switch hands and repeat.
              Why?
              Most abs routines veer too far down the crunch route, leading to an imbalance whereby the obliques are not developed enough. This exercise is one of the best for targeting the latter. Strong obliques provide a foundation of rotational strength, vital for those who play contact sports or are in physical/manual occupations.

              Dumbbell Woodchop:

              HOW TO:
              • Squat, holding the weight in both hands to one side.
              • Raise it across your body to head height, then back down.
              • Do all the reps, then switch sides.
              Why?
              Another excellent oblique-targeting move, this also improves your body’s co-ordination and core strength because you need to resist rotating the torso.

              Crunch with dumbbell:

              HOW TO:
              • Lie flat on the floor with your knees bent, holding the dumbbell to your chest with both hands.
              • Use your upper abs to raise your torso, then lower slowly to the start.
              Why?
              The crunch is the true test of fundamental core strength and provides great stimulation to the abdominals. The only way to increase its difficulty is to add weight, and the dumbbell crunch does this perfectly. Pick a weight you can perform eight to ten reps with, and initiate through the abs muscles themselves, not the hip flexors.

              Dumbbell Russian twist

              HOW TO:
              • Start at the top of the crunch but with your feet off the ground.
              • Rotate back and forth, keeping your abs braced.
              • A twist to one side then the other counts as one rep.
              Why?
              The elevated position of the feet in this exercise places enormous strain on both the upper and lower abs, which are typically a tricky area to stimulate. The twisting movement involves the obliques also which you will find invaluable when stabilising the body on heavy, compound lifts.